When you have multiple teams and each team produces heaps of code as part of their deliverables, managing the code without any proper tool is a laborious task especially in an agile project management process. Keeping track of each version is a daunting task in such scenarios. There is a chance of everything can go haywire right from versioning, coordination, till final delivery.
With Team Foundation Server (TFS) you can bid adieu to all hassles. TFS is a top Microsoft product for managing source code. With TFS (5 basic accounts are free) you can manage projects for both waterfall & agile styles. Requirement management, automated builds, testing & release management capabilities, and lab management becomes simple with TFS. You can also use TFS as back-end to various development environments (IDEs). However, you can only use TFS for Microsoft Visual Studio as well as Eclipse on all platforms.
This blog gives you a walk through on how to access work items in TFS.
There are multiple ways to access work items in TFS. One of them is TFS API call and another is WIQL (Work Item Query Language). We will be discussing WIQL in this blog.
Scope
Every project team uses a specific Project Management tool so that they can manage their Projects, Tasks, Sprints, etc. If they need to shift to TFS for project management, migrating manually is a tough task as the teams need to create everything on a manual basis.
To overcome such problems TFS API is very convenient as it provides multiple ways to fetch and manage (update/delete) those work items and sync them with their Project management tool. This can be very helpful in saving precious time and resource.
1. Getting started with TFS
If you haven’t registered with Microsoft, then first you need to register to go ahead. You can create a new one either by using your own email address or by creating new email address (@outlook.com / @hotmail.com ).
After logging into Visual Studio, we need to create a new account on which all our projects will be hosted. We will use ‘WorkItemDemo’ (WorkItemDemo.visualstudio.com) as the name of account. Also, we will be using ‘Team Foundation Version Control’ to manage code for this account.
When you will click on ‘change details’ it will give 3 input boxes to change following details:
- Project name -> MyFirstProject
- Organize work using -> Agile
- Host your projects in -> India South
2. Create new Project
Once a new account is successfully created, a new project will also be created along with it. By default, the project name will be ‘MyFirstProject’ which can be renamed.
Let’s create some new tasks in ‘MyFirstProject’ project first: (these new tasks will be known as TFS API or WIQL in the later phases)
1) From dashboard hover on Work (Menu item) > New Work Item > Task

2) ‘New Task’ popup will open. Enter all the required details in respective fields and then click on Save and Close button. Follow the same process to create few more task work items.
3. Personal Access Token
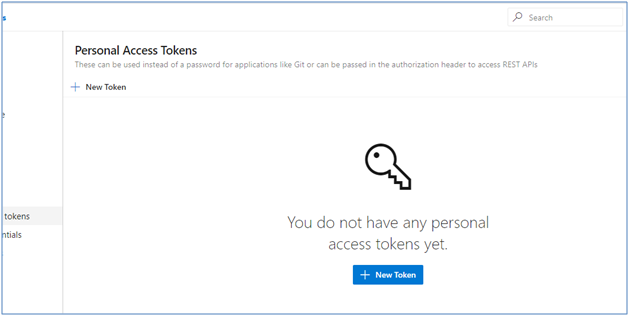
To access all work item related details from TFS API, we will create PAT (Personal Access Token) for authentication.
- Sign in to your TFS account.
- From Profile (on top right corner), click on Security.

- Create a personal access token by clicking on ‘Add’ button.

- Enter all the required details and then click on ‘Create Token’ button.
- Make sure you copy the newly created token as you won’t be able to see it again. And store it in a safe place as it can be unsafe if it goes into wrong hands.
4. Prerequisite for creating Work Items
Following points need to be fulfilled before getting started into coding:
- TFS account.
- Personal Access Token (PAT)
- Project having Work Items
- Visual Studio
- Getting Work Items from TFS
Post creating TFS account, Project, Task items, PAT, etc. let’s fetch the list of task items in our code.
Getting Work Items by using Work Item Query Language (WIQL)
- Create new project in Visual Studio and name it as per your convenience. You can create new project with MVC template.
- Add new class file, name it as cs
- Add following code in ExecuteQuery.cs


- Add following method code in same class file

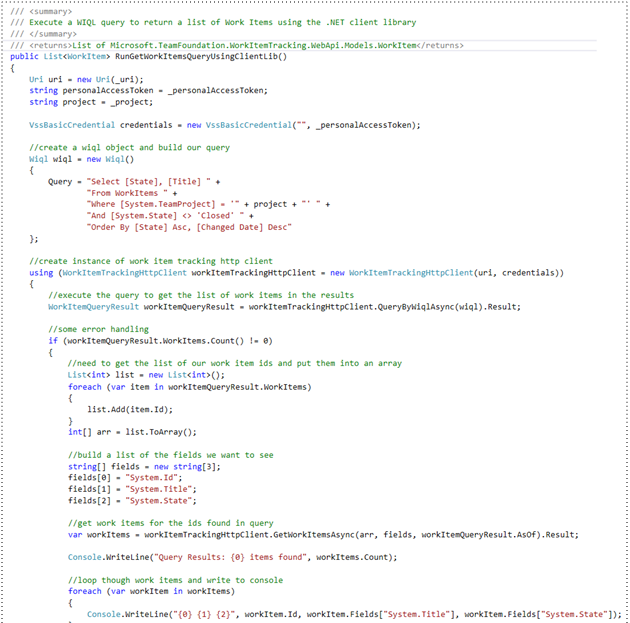
In the above method code, constructor “ExecuteQuery()” assign some important values like URI, PAT, Project name which needs to be queried for getting list of work items.
In code method “RunGetWorkItemsQueryUsingClientLib()”, following code defines the query which will select “State” and “Title” of work items. Also, it defines that only particular project will be queried for getting the result which was defined in constructor method. Same with state of the work item that only those work items will be fetched whose state is not equal to ‘Closed’.
Following code fires the query which is stored in variable named as ‘Query’ in previous image and the result of the query will be assigned in ‘workItemQueryResult’.
Following code will loop through the ‘workItemQueryResult’ variable and iterate on each and every item to get the details of work item returned by query.
Based on the query and its condition, will get the list of id(s) from the Task list. Those id(s) are passed as array type in 1st parameter in “GetWorkItemAsync()” method. Below is the output of “GetWorkItemAsync()” method.

Conclusion
This is how we can use WIQL to get the list of Work Item(s) from TFS into our custom web application and perform further operations as needed like store it in DB, display it in some report / grid and fulfill our requirements. Such work items help in brining all your code onto one platform by streamlining the whole process. The respective teams can upload their versions of the builds on TFS and it ensure chaos-free working environment by boosting project delivery time.


